
Introduction
Many a year ago, my brother got a brand new Nintendo 64 for his birthday. I still fondly remember the first time he flicked it on; seeing that floating Mario head pop up on the CRT in its full 3D glory blew my little mind away. I couldn’t phantom that graphics would ever get more lifelike… Or so I thought!
At the time, Super Mario 64 was both impressive due to the fantastic gameplay (but that’s a topic for another day!) as for its visuals. Especially regarding the latter, the video game industry hasn’t been resting on its laurels. Nowadays the polygon count is pumped up the wazoo due to ever-increasing hardware power, and many fancy rendering techniques are applied. One of these rendering techniques reached proper buzzword status in the past few years: ray tracing. It has been a staple of the movie industry for quite a while now, but recently it’s popping up in games as well. But why? What’s so special about ray tracing?
 Ray tracers are so-called physically based renderers. They aim to model light transport between a virtual camera and light sources in a program. This makes them incredibly intuitive to reason about, as this is exactly what happens in real life! For example, light sources such as the sun or a clip-on GameBoy light emit rays of energy, also known as photons. These photons travel around your surroundings, bouncing against various objects along the way until some of them reach your eyes, resulting in a picture on your retina. Ray tracers mimic these laws of nature, allowing them to produce photo-realistic images.
In short, ray tracing is pretty rad. So why not try our hand at making one? In this series I will walk you through the process of writing Manta Ray, my custom ray tracer (yes, I’m proud of that name).
Ingredients
This project is going to support physically based rendering with a focus on real-time interactivity. Due to my interest in games I’d like to make Manta Ray pretty fast. Since speed is important to me I opted to use C++; if you’re following along, do note that you can pick whatever programming language you fancy!
In time this series will roughly cover the following topics:
- Ray tracing fundamentals
- Outputting an image, creating rays and implementing a basic camera
- Intersections with various primitives
- Whitted-style ray tracing
- Acceleration structure construction and traversal
- Stochastic approaches to anti-aliasing, depth of field, soft shadows, and more
- Path tracing
- Variance reduction
- Filtering techniques
- Perhaps more as I see fit
Without further ado, let’s get on with it!
Don’t get discouraged if these topics do not make much sense at the moment! All of them will be discussed in-depth eventually.
Outputting an image
Showing an image is the very first thing a renderer should be able to do. After all, there’s no point in rendering if we can’t see the result! To kickstart the project, I’m using a nice template which provides us with a basic framework for graphics programming in C++. It includes a 32-bit RGB screen buffer to push the rendering results to, some mathematical helper classes and it even comes with OpenCL support if we’d ever fancy a GPU implementation. This way we don’t have to worry about mundane background stuff and get straight to the fun bits!
Now then, let’s jot down some C++ code to output a simple image:
1
2
3
4
5
6
7
8
9
10
11
12
13
14
15
16
17
18
19
20
21
22
23
24
25
26
27
// the width and height of the screen buffer
#define SCRWIDTH    512
#define SCRHEIGHT   512

// this method is called once per frame while the application is running
void mantaray::Tick(float deltaTime)
{
    // clear the previously drawn frame by resetting the screen buffer to black
    screen->Clear(0);

    // loop over all the screen buffer pixels as if reading a book: left->right, top->bottom
    for (int y = 0; y < SCRHEIGHT; y++) for (int x = 0; x < SCRWIDTH; x++)
    {
        // calculate some values for the red, green and blue components of a pixel
        float r = float(x) / (SCRWIDTH - 1);
        float g = 0.25f;
        float b = float(y) / (SCRHEIGHT - 1);

        // convert the calculated values from a [0, 1] range to a [0, 255] RGB range
        int ir = static_cast<int>(255.0f * r);
        int ig = static_cast<int>(255.0f * g);
        int ib = static_cast<int>(255.0f * b);

        // draw the color to the current screen buffer pixel
        screen->Plot(x, y, (ir << 16) + (ig << 8) + ib);
    }
}
There are some things to note in this code snippet:
- We loop over each pixel of the screen buffer from left to right, top to bottom. This is by convention; the top-left corner is often defined as the origin when it comes to computer graphics. This might be confusing if you’re used to mathematical grid implementations which usually have the origin sitting at the lower-left corner, so watch out!
- Another common aspect is to map the red/green/blue component values to a range of 0.0 to 1.0, inclusive. This will later be altered when high dynamic range is implemented.
The resulting image should have its red component go from black on the left side of the screen to bright red on the right, while the blue component goes from off at the top to fully on at the bottom. This means that both components should be maxed out in the lower-right corner, resulting in purple. And indeed:
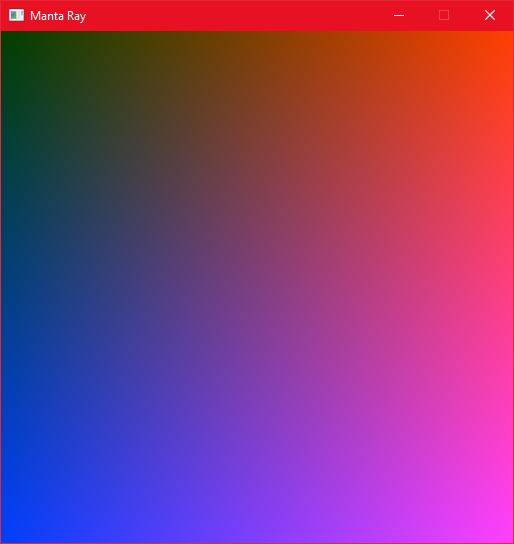 Hello Manta Ray!
It’s a good idea to “sanity check” your program early and often. This will help prevent frustrating bugs later on.
That wraps it up for now! All great things comes from humble beginnings. At least we’re able to render images to the screen buffer, which is an important first step. The next post will (quite literally) introduce a new view as it’ll be about setting up a virtual camera, basic ray casting and vectors. See ya! 🐋